Choosing a Design Problem

We’ve spent about a month at this point brainstorming ideas for our bioreactor and have settled on some initial goals and conclusions:

Our bioreactor will simulate compression on chondrocytes in cartilage. We picked compression because it seemed like a reasonable mechanical scenario to implement in the timespan we have, and it is relevant to clinical problems (e.g. repeated compression loading of intervertebral discs over time causes cellular damage, manifesting in herniations, osteoarthritis, etc.)

Currently, there are few high-throughput solutions for investigating drugs that can reverse the harmful effects of compression on articular cartilage. Bioreactors exist for applying hydrostatic pressure and compression force on 3D tissue cultures, but in general they deal with a small (1-10) number of conditions at once. See Mauck et al. 2007 for an example of a compression bioreactor, and Reza and Nicoll 2009 for an example of a hydrostatic pressure bioreactor. Relevant figures from each paper are below:

Mauck et al. 2007

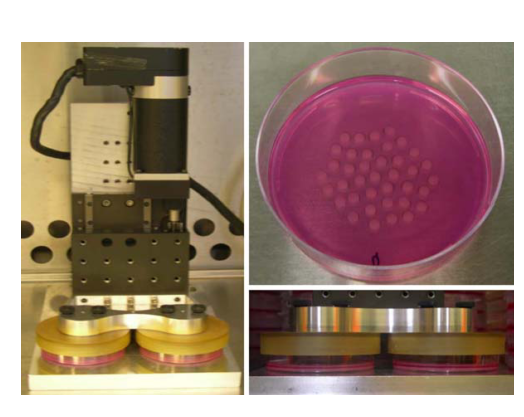
Mauck et al. 2007: Compression bioreactor on “discs” of alginate containing chondrocytes.

Reza and

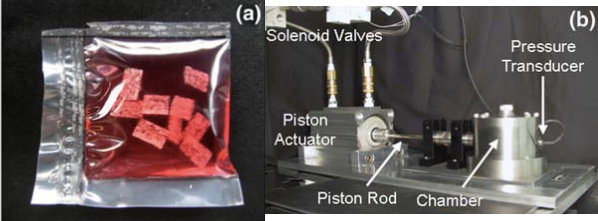
Reza and Nicoll 2009: Hydrostatic pressure bioreactor on “bricks” of annulus fibrosus cells.

It is evident from these pictures that the experimental apparatus operates on dozens of replicates in the same environment, but there is no way to change the environment for individual replicates, nor to easily scale up the experiment to thousands of conditions. Very recent designs (see Hudson et al 2014) utilize 24-well cell culture plates but appear to require manual interaction for each experiment on each plate.

High throughput screening techniques have become more widely accessible to research laboratories as the cost of automating liquid/sample handling and imaging many samples at once has plummeted. The Integrated Screening Core at ISMMS is an example of one such facility that can automate the application of thousands of compounds to samples in 96- and 384-well plates, while reading fluorescence-based phenotypic assays. Most current screening experiments are based on phenotypes in 2D and liquid cell culture. Certain clinical scenarios however, like osteoarthritis or intervertebral disc herniation, are more realistically simulated in organs or 3D tissue culture, because the compression that occurs in vivo involves the 3D structure of the multicellular tissue.

Therefore, we wanted to make our bioreactor both able to compress 3D tissue cultures and integrate into a high throughput workflow, which we believe is a novel combination of capabilities. A major potential application of this work is the in vitro automated screening of up to thousands of compounds that reverse or mitigate injury phenotypes in chondrocytes, mesangial stem cells, and annulus fibrosus cells after repeated compression. Injury phenotypes that we could screen for in a relatively high-throughput manner using plate readers include apoptosis, as measured by a lanthanide-based flourescence assay for the activation of caspases. An example assay is described in Karvinen et al. 2004. Assay kits for caspases, including compatible microplate readers, are also commercially available. The discovery of compounds that can prevent compression injury in cartilage could have therapeutic potential for osteoarthritis, which affects 15% of the general population (Johnson and Hunter 2014), along with many other diseases of articular cartilage senescence and injury.

Gantt Chart

We’ve created a Gantt chart that outlines our current timelines for project subitems and the dependency relationships between subitems.

Following our discussion today, we will decide who takes primary responsibility for each task at an upcoming meeting.

DrawBot Field Trip

Arduino is an open-source electronics prototyping platform that allows students, engineers, and hobbyists to relatively easily attach sensors, motors, and other peripherals to a microcontroller, and program it using a desktop computer.

We were given a task that would build our familiarity with this platform that will come in handy for our upcoming project, in which we will have to design a bioreactor.  If our bioreactor has mechanical components, we will likely end up controlling them with the Arduino because of its cost, simplicity, and strong community.  1 Arduino Uno (a midrange model) is ~$25, and there are hundreds of compatible components at Adafruit, including the Motor Shield v2, which we were also provided with.

Our task was to have the Arduino control two stepper motors that would spool strings attached to a pen, and have the pen draw a triangle on a provided easel (thereby inspiring the name “DrawBot”).  There are a number of variations on this task online, with openly available solutions, many of which also call themselves DrawBots.  Here’s an impressively precise prior implementation called the Makelangelo DrawBot.

Our group set out to The Cooper Union to learn a little Arduino wisdom and check out their lab space.

IMG_1131

The first task was to wire up the boards to a power supply and stepper motors, which takes a steady hand and a soldering iron.  AK is hard at work on this task:

drawbot1

Now that everything is wired up, time to fire up the Arduino IDE and see if the computer can control the stepper motors.  Initial twitches of the motors are greeted with relief.  Alright, we’re in business!

drawbot2

Our instructor looks on nervously as we order our DrawBots to gyrate in strange and unpredictable ways.

drawbot4

Here Ben is scouring Ted’s code for bugs that seem to be distorting the DrawBot’s coordinate conversion functions.  Since the strings are not orthogonal and the angle between them changes as the spools vary the string length, the motions to produce a straight line are not simple and require precise acceleration curves for the stepper motors.  Since our task is to draw a triangle, we need the pen tip to move in straight lines from vertex to vertex.

drawbot3

We decide to wrap our mostly-assembled DrawBots for the day and proceed with further work back at Mount Sinai.  Except for Ted, who is clearly not looking forward to debugging his own code, the team is pleased with this outcome.

drawbot5

Complete! Presentation Preparation!

After much hard work the group was able to assemble the Shear Bioreactor Prototype! Right in time for our final presentation tomorrow.

IMG_1957.MOV

The working prototype mechanism of action:

Final product!

(Please click on the picture if the gif does not load)

_______________________________________________________________
I hope you enjoyed the journey as much as we did!

-2013 DTE Team:
Grace, Mitch, Kevin, & Ben

Machining/Assembly Process

The order was successfully given to Arthur and put into the Zahn Center for paddle/tissue fork 3D printing. Our initial meeting them was extremely helpful and we learned to include more tolerance to allow the tissue forks to move in and out of the holder.

We also began the machining process after receiving the cut pieces from Phillip and his lab.

IMG_1860

IMG_1911

IMG_1859

Machining Planning

We have received all of the materials that we ordered from Adafruit (Arduino accessories) and McMaster Carr. There was some confusion (as there sometimes in with many parts and multiple vendor orders) and some parts were missing/incorrect sizes. After some exchanging and re-ordering, all of the correct parts arrived.

We then composed a Gnantt chart to document what tasks we have left and what pieces needed to be assembled/machined. We considered the available resources and made decisions of what machining we could manage ourselves (with help from Pete, of course), what parts Phillip Cook could make, and what we would have to outsource to the Zahn center.

Screen Shot 2013-12-18 at 6.01.54 PM

We decided that Phillip Cook and Brian would do the initial base cuts (we ordered double the size of the bases needed so we would have a spare) of the two large base pieces and the actuator arms. The Zahn center would 3D print the paddles and tissue forks. Pete and the gang would make drill holes, dish placers, motor slot, etc., and take care of the assembly.

Motor Arduino Programming Beta Version Complete!

Grace, Pete, and Ben have been trying to debug the output speed issues with the current Arduino motor configuration. This project utilizes Arduino Uno with a motor shield as well two 512 step bipolar motors (5V and 12V) as well as a 200 step (12V) and an external power source. The 200 step motor is slightly larger than the other two and has higher torque. This motor was purchased after the fact as the group wasn’t sure if the former motors would have enough power to correctly move the mechanism.

IMG_0726

Issues came about because the motor would output weak force that could be manually stopped fairly easily. Also it took around 3.5 seconds to perform one full rotation. The motors also only rotated in one direction when we expected them to be able turn back and forth.

Through some debugging, the group realized that there was a wiring issue which resolved the rotation issues as well increased the power output. Professor Costa also indicated that a stronger external power source (which the group purchased) would increase the output.

Mitchell, Kevin, and Pete calculated the exact angles the motor has to turn to (45 degrees). Accordingly, the motor will turn 64 steps (512 step motor) in each direction to achieve this.

As of now, the program is complete and will perform said actions upon a user initiated keystroke.

Sketch Optimization and Problem Solving

Kevin continued to work to optimize the SolidWorks file. This was an important step because many of these parts will be sent off for machining and processing (both at Mount Sinai and the Zahn Center at City College). Issues have arisen in terms of connecting the parts of the bases together as well as motor space requirements. There are some problems with motor power and the group ordered a stronger Bipolar Stepper Motor as a possible fall back, but the size of this new motor is a lot larger than the previous one.

These seemingly minute issues can have large impact on the machining process so these changes are important to finalize early on as to prevent wasting of time/effort/money. Attached is an updated sketch from SolidWorks made by Kevin that demonstrates the bioreactor mechanism of action through a different angle:

Image