
Previously: Customizing the Sidebar. Part of a series of tutorials on using WebCommons.
If you are planning to update your website fairly frequently, e.g., monthly or approximately around that timescale, it is worth considering taking your website from a collection of Pages and centering the content around Posts.
What’s the difference? Posts are the core of a traditional weblog (and even new platforms like Tumblr), where each piece of content has a date attached to it, and the most recent articles are shown first—typically on the front page, but sometimes on a secondary page. In WordPress, posts can also have categories and tags, which allow them to be organized in a multitude of ways. A few WebCommons sites (example 1, example 2) that were intended to be updated incrementally primarily use Posts instead of Pages.
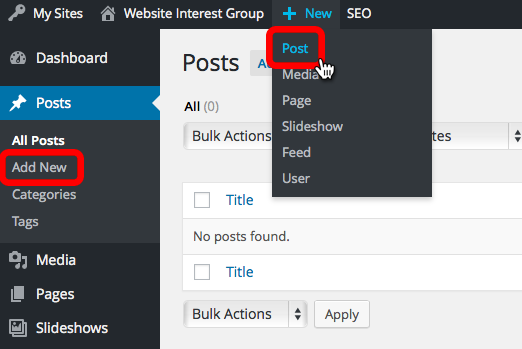
Your first post
Posts are created much like pages, so if you if are comfortable with that, there is very little to learn. There are a couple ways to begin the process from the WordPress interface:
Once you’ve entered the Post Editor, you’ll notice it looks entirely similar to the Page Editor. You can set a title, modify the content, apply formatting, and drag and drop images right into the editor to upload and insert them. You’ll see some unique features on the right hand side, though:
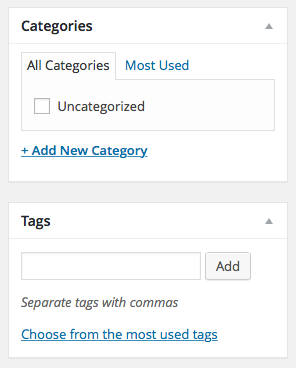
These are both tools for organizing your posts. The general difference is that Categories are meant for broad classification while Tags are for more granular detail. You can read elsewhere about all the differences, but in brief: categories can be arranged in a nested hierarchy, so much like a scientific journal, you could potentially arrange Posts into volumes and issues or sections; tags have no such hierarchy. It should also be noted that all Posts must be in at least one Category, which by default is set to the “Uncategorized” category.
As always, once you’re done writing the Post and categorizing or tagging it, you should click the blue Publish button to put it on the web. Similarly to Pages, you can also use the Save Draft button if you’re not quite ready to publish but want to save your work.
Displaying lists of posts
In the default WebCommons template, although you can create posts, they won’t appear anywhere on your website and your visitors won’t be able to find them. This is because most WebCommons sites don’t need any posts. That’s easy to fix, however.
![]() To get started, you want to return to the Customize panel. Do you remember how to do this from the earlier tutorial? (Either click the Customize button while logged in and viewing the homepage of your site; or, from the left-hand sidebar of your Dashboard, go to Appearance > Customize.)
To get started, you want to return to the Customize panel. Do you remember how to do this from the earlier tutorial? (Either click the Customize button while logged in and viewing the homepage of your site; or, from the left-hand sidebar of your Dashboard, go to Appearance > Customize.)
In the Customize panel, go to Static Front Page. You should now be looking at the options that control where your posts show up on your site.
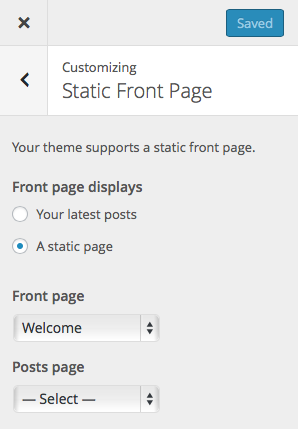
You’ll notice that here, you can simply set the front page to be a list of your posts. In this case, the Welcome page will remain on your header menu, but it won’t be the first thing your visitors see.
You can also leave the front page as a static page (the second option and selected by default), and choose some other page that will be replaced entirely with a list of posts (the “Posts page”). Note that that page’s content isn’t actually deleted, it’s merely hidden for the sake of showing the posts. For example, here we have replaced the Upcoming Events page with a list of posts. You can use the live preview on the right to verify what this looks like.
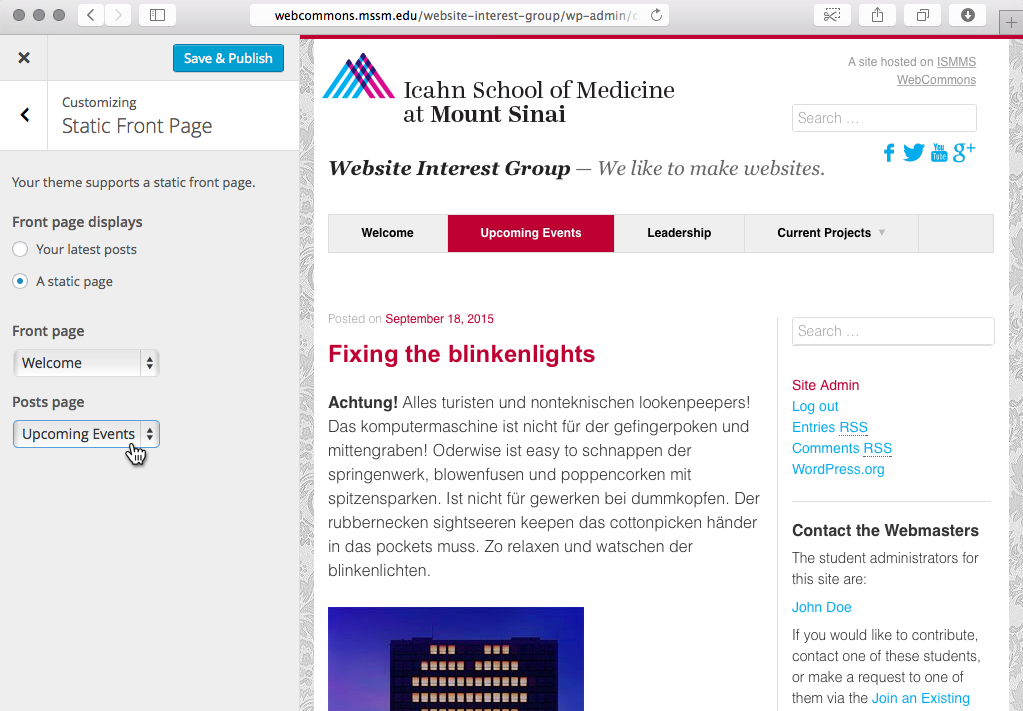
As always, once you’ve made your changes in the Customize panel, do not forget to click the blue Save & Publish button, or your changes will be discarded.